Drawing a football player can be fun and rewarding. It’s great for improving your art skills.
In this guide, you’ll learn simple steps to create a realistic football player drawing. Whether you’re a beginner or an experienced artist, this tutorial will help. With easy-to-follow instructions, you’ll soon have a detailed football player on your paper. Drawing sports figures can boost your ability to capture movement and action.
Plus, it’s a great way to express your passion for the game. Get your pencils ready, and let’s start sketching a football player that looks dynamic and lifelike.
Materials Needed
Drawing a football player can be both fun and challenging. The right materials will help you create a stunning piece of art. Below, we outline the essential and optional tools needed to bring your football player to life.
Pencils And Erasers
Using the right pencils is crucial for sketching. Start with an HB pencil for outlines. Use a 2B pencil for darker areas and a 4H pencil for lighter shading. Keep a good eraser handy to correct mistakes and refine your drawing. Kneaded erasers are great for lightening areas without leaving residue.
Paper And Sketchbooks
Choosing the right paper is essential. A smooth, thick paper works best for detailed drawings. Sketchbooks provide a portable and organized way to keep your work together. Select a sketchbook with at least 60 lb (90 gsm) paper for durability. Spiral-bound sketchbooks make it easy to flip through pages.
Optional Tools
While not necessary, certain tools can improve your drawing experience:
- Blending stumps: Great for smooth shading.
- Rulers: Ensure accurate proportions.
- Mechanical pencils: Provide consistent lines.
- Colored pencils: Add vibrancy to your drawing.
Below is a table summarizing the essential and optional tools:
| Essential Tools | Optional Tools |
|---|---|
| Pencils (HB, 2B, 4H) | Blending stumps |
| Erasers | Rulers |
| Paper | Mechanical pencils |
| Sketchbooks | Colored pencils |
Basic Sketch
Creating a basic sketch of a football player can be an enjoyable task. This guide will help you through the initial steps. It’s important to start with a simple outline. This will make the drawing process easier. Follow the steps below to achieve a good sketch.
Drawing The Head
Start by drawing a circle. This will be the head. Add a vertical line down the center. This helps with symmetry. Add a horizontal line for the eyes. Place it slightly below the middle. Draw two smaller circles on the horizontal line for the eyes.
Add a small oval for the nose. Place it below the eyes. Draw a curved line for the mouth. Place it below the nose. Sketch two curved lines from the sides of the head. These are the ears. Finally, add some details to the face. This makes it more realistic.
Outlining The Body
Draw a vertical line below the head. This will be the spine. Add an oval for the chest. Place it at the top of the spine. Draw another oval below it. This will be the abdomen. Connect the two ovals with curved lines. This forms the torso.
Next, draw lines for the arms and legs. Use simple straight lines. Add circles at the joints. This helps with proportions. Draw the hands and feet as small ovals. Connect the lines with curves. This forms the muscles and limbs. Sketch the details of the uniform. This makes the football player look complete.
Adding Details
Adding details is crucial to bring your football player drawing to life. This section will guide you on refining facial features and muscle definition. These steps will make your drawing more realistic and engaging.
Facial Features
Start with the eyes. Draw them slightly almond-shaped. Add pupils and a small highlight to make them look lively. Sketch the eyebrows above the eyes. Use simple curves for a natural look.
Next, draw the nose. A small line for the bridge and two curves for the nostrils will do. Keep it simple. For the mouth, draw a slight curve for a neutral expression. Add a line in the middle for the lips.
Don’t forget the ears. Draw them level with the eyes and nose. Use a simple C-shape for each ear. Detail the ears with small lines inside. Finally, add hair. Use short strokes for texture. Follow the head’s outline for a natural flow.
Muscle Definition
Draw the neck muscles first. Two lines from the jaw to the collarbones will work. Show the shoulder muscles with curved lines. They should connect the neck and arms.
For the arms, outline the biceps and triceps. Use smooth lines to show the muscles. Keep the lines light and natural. Add the forearm muscles with a few curved lines. Make sure they follow the arm’s shape.
Next, focus on the chest. Draw two curved lines for the pectoral muscles. They should connect to the shoulders. Add a few lines on the stomach to show the abdominal muscles. Keep them simple and aligned.
For the legs, outline the thigh and calf muscles. Use curved lines to show the muscle shapes. Make sure they connect smoothly. Add a few lines on the knees for detail. Show the muscles without overdoing it.
Remember, less is more. Use simple lines to suggest muscle definition. It will make your drawing look more realistic and engaging.

Credit: www.youtube.com
Drawing The Uniform
Drawing the uniform is a fun part of sketching a football player. It adds character and detail to your drawing. This section will guide you through drawing the uniform, focusing on key elements such as the jersey, shorts, cleats, and socks.
Jersey And Shorts
Start by drawing the jersey. Make it fit snugly around the player’s torso. Add short sleeves or long sleeves based on your preference. Don’t forget to draw the collar and any logos or numbers. These details make the jersey look more realistic.
Next, draw the shorts. They should fit comfortably around the player’s waist and thighs. Add folds and creases to show movement. Draw the waistband and any stripes or patterns. These small details bring your drawing to life.
Cleats And Socks
Draw the cleats by sketching the outline of the shoes. Cleats have studs on the bottom for grip. Make sure to add these. They are essential for a football player’s footwear. Add laces and any brand logos.
Socks are usually long and reach the knees. Draw them with slight wrinkles to show they are worn. Add any stripes or team colors. This adds an extra layer of detail to your drawing.
Including Accessories
Drawing a football player involves more than just sketching the body. Accessories play a crucial role. They bring the character to life. They add realism and detail to your drawing. Let’s focus on two key accessories: the helmet and gloves, and the football.
Helmet And Gloves
The helmet is essential for any football player. Start by drawing an oval shape for the helmet. Add a face mask by sketching horizontal and vertical lines. These lines should form a grid pattern. Don’t forget the ear holes on the sides. They are small circles near the bottom of the helmet.
Next, draw the gloves. These are simple yet detailed. Begin with the outline of the hands. Add lines for the fingers. Make sure to include the padding on the gloves. This gives them a realistic look. The padding can be shown by adding small rectangles on the fingers and palm area.
Football
The football is a key element. Start with an oval shape. Make it slightly pointed at both ends. This gives it the classic football look. Draw two curved lines from one end to the other. These lines should follow the shape of the football.
Next, add the laces. Draw short, horizontal lines across the top curved line. These lines should be evenly spaced. The laces help in making the football look realistic. Add some shading to give the football depth. Lightly shade the areas where the football curves.

Credit: www.youtube.com
Adding Motion
Drawing a football player involves more than just capturing the likeness. Adding motion brings your drawing to life. It transforms a static image into an action-packed scene. This section will guide you on how to add motion to your football player drawing.
Action Poses
Start by choosing an action pose. Think of a football player running, jumping, or kicking the ball. These poses convey movement. Consider the player’s posture. A bent knee suggests running. An extended leg suggests kicking. Action poses make your drawing dynamic.
| Action | Pose Description |
|---|---|
| Running | Bent knees, leaning forward, arms pumping |
| Jumping | Legs off the ground, arms raised, body extended |
| Kicking | One leg extended, opposite arm forward, body twisted |
Dynamic Lines
Use dynamic lines to show movement. Curved lines and varying line thickness add energy. Draw lines that follow the player’s motion. For a running player, lines behind the legs show speed. For a jumping player, lines beneath the feet show lift.
- Curved lines suggest fluid motion
- Varying line thickness adds depth
- Lines following motion create energy
Combine action poses and dynamic lines. Your football player will appear in action. Remember, the goal is to depict movement. Use these techniques to make your drawing engaging and lively.
Shading And Textures
Shading and textures bring a football player drawing to life. These techniques add depth and realism. They also help to highlight the details that make a player look realistic. Learning how to shade and add textures can make your drawing stand out.
Light And Shadow
Understanding light and shadow is key. Light defines the shape and volume of the player. Observe where the light source is coming from. This will help you decide where to place shadows. Light areas should be bright and clear. Shadows should be darker and more defined. Use a soft pencil for light areas. Use a harder pencil for dark areas.
Start shading lightly. Build up the darkness slowly. This helps to create a smooth transition between light and shadow. Pay attention to the curves of the muscles and uniform. These areas will have different shades. Light and shadow add depth to the drawing. They make it look more three-dimensional.
Texture Techniques
Textures add realism to your drawing. Football uniforms have different textures. The fabric may be smooth or rough. The boots may be shiny. Use different pencil strokes to create these textures. For smooth areas, use light, even strokes. For rough areas, use short, quick strokes.
Remember the helmet and pads. These have their own textures. The helmet is usually shiny and smooth. Pads may have a rougher texture. Use shading to show these differences. This makes the drawing more lifelike. Focus on small details. They add to the overall texture.
Final Touches
Once you’ve drawn the basic outline of your football player, it’s time for the final touches. These last details will bring your drawing to life and make it stand out. Let’s explore the final touches in detail.
Reviewing The Drawing
Start by reviewing your drawing. Look at the overall shape and proportions. Ensure everything looks balanced and accurate. Here’s a quick checklist:
- Check the player’s pose and stance.
- Ensure the uniform details are clear.
- Verify the facial features and expressions.
- Look at the hands and feet positions.
Take your time to make any necessary adjustments. Use an eraser to clean up any stray lines. Sharpen your pencil for more precise details.
Adding Background
Adding a background can enhance your drawing. It sets the scene and context. Here are some ideas for your football player background:
- Stadium: Draw a simple stadium with cheering fans. Add goalposts and field lines.
- Practice Field: Create a practice field with cones and training equipment.
- Locker Room: Sketch a locker room with benches and lockers.
Keep the background simple to not distract from the main subject. Use lighter shades for background elements. This will make your football player stand out more.
Once the background is in place, review your drawing again. Make sure everything looks cohesive and well-integrated.
Remember, the final touches can make a big difference. Take your time and enjoy the process!
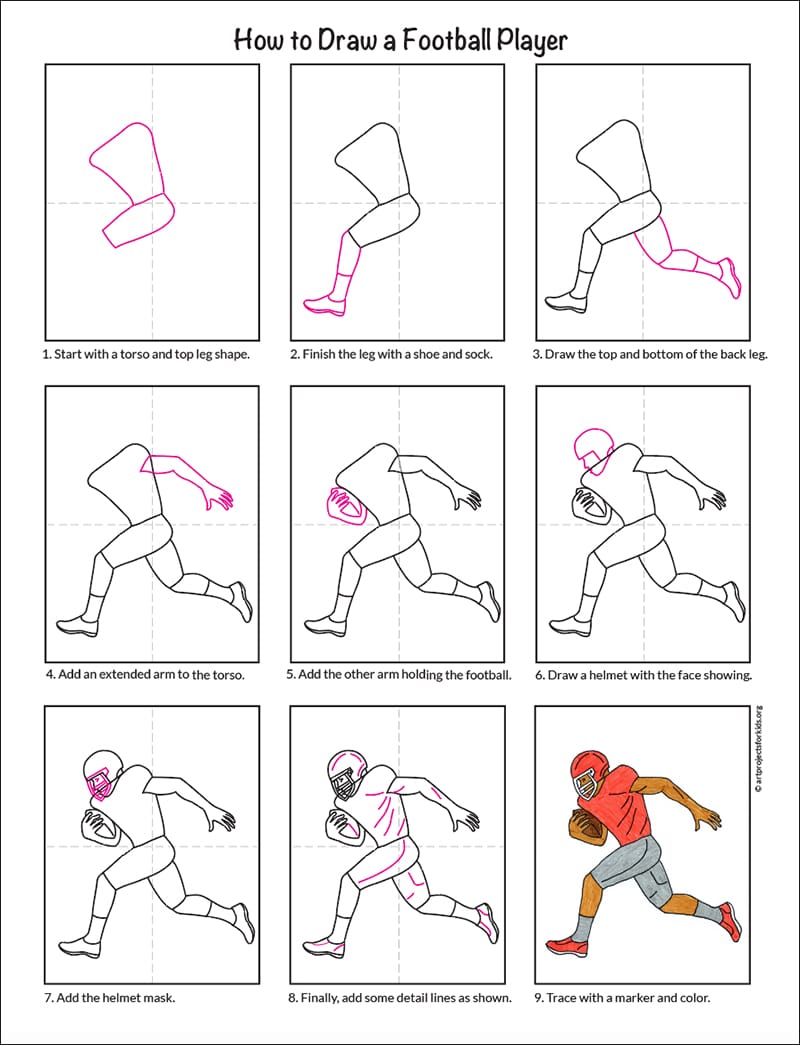
Credit: artprojectsforkids.org
Frequently Asked Questions
How Do You Start Drawing A Football Player?
Begin by sketching basic shapes for the body and limbs. Use circles for joints and lines for limbs.
What Tools Do I Need To Draw A Football Player?
You will need pencils, erasers, sketch paper, and optionally, colored pencils or markers for detailing.
How Can I Draw Realistic Football Player Poses?
Study reference photos of football players in action. Focus on capturing dynamic movement and correct proportions.
How Do I Add Details To A Football Player Drawing?
Add details like the uniform, facial features, and muscle definition. Use shading to create depth and realism.
Conclusion
Drawing a football player is fun and easy. Follow each step patiently. Practice often to improve your skills. Use simple shapes to start. Add details slowly. Keep your lines light at first. This way, you can fix mistakes easily. With time, you’ll get better.
Enjoy the process. Share your art with friends. They will appreciate your effort. Drawing can be a great way to relax. Keep creating and have fun. Happy drawing!